How to Make Your Own Business Cards

As we explained earlier this year, it’s easier than ever to create your own marketing materials. And that includes DIY business cards. You don’t need to outsource this essential business collateral. When you make your own business cards, you have control over card stock thickness, font, colors, and design. All you need is a printer, discount printer cartridges, your preferred paper, software, and little creativity. Let’s get started!
Step-by-Step Instructions for Making Your Own Business Cards
Software
With free tools like Canva, you can be your own designer.

- Sign up with your email address, Google account, or Facebook account.
- Select the business card template and choose the desired background color, font size and style, and any graphics.
- Use text boxes to add copy, such as your name and other contact information.
- Instead of or in addition to using the graphics choices within Canva, you can upload your own images too. So go ahead and add your logo or another element unique to your brand.
- Save your design and then print out the business card once you have set up your printer.
Canva makes it easy to change your design at any time. If you want to save the original, you can also duplicate the design and modify the duplicate instead.
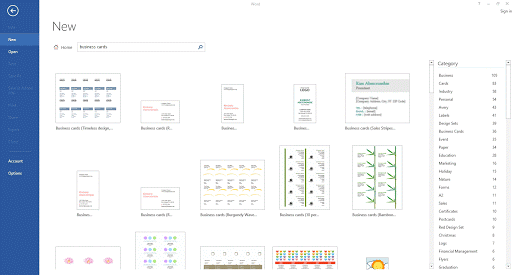
You could also use everyday software, such as Microsoft Word, to make your own business cards. Word is easy to use but you’ll have a little less customization than Canva or higher-level graphic design tools.

- Open Word and type “business cards” in the search box at top. Or if you already have another document open, Select New under the File menu first.
- Choose one of the templates.
- You can change the font and font color but most of the templates don’t allow you to use different images.
Paper and Printing
You should really use firm card stock paper so your business card doesn’t turn out too flimsy. We recommend 12 pt (260 gsm) or 14 pt (310 gsm) card stock for an optimal business card.
If you buy pre-cut sized paper, you’ll have to print one card at a time. Try the helpful tips herefor printing cards one by one.
Using a whole sheet for printing business cards is usually more economical.
- Arrange the cards in a grid and make sure the borders are visible (so you know where to cut later). Note that the Word templates are already in a grid so you can skip this step.
- Verify that your printer is set up to the correct size based on your sheet of paper.
- Verify that your ink levels are high enough to complete this printing project.
- Once printing is complete, use sharp scissors to cut the individual cards.
Now wasn’t that easy? Not to mention that when you take on this project yourself, you can unleash your creativity and put your stamp on your business’s brand. Do you plan on making your own business cards? Share your business card ideas below or on Facebook and Twitter.
